In June last year, I moved into a new property in Oxfordshire. The house, I guess, could be considered a new build since it was built in the last couple of years, and the assumption is that it has been built to building regulations, therefore there is a huge amount of insulation within the fabric of the building, ensuring it was very energy efficient.
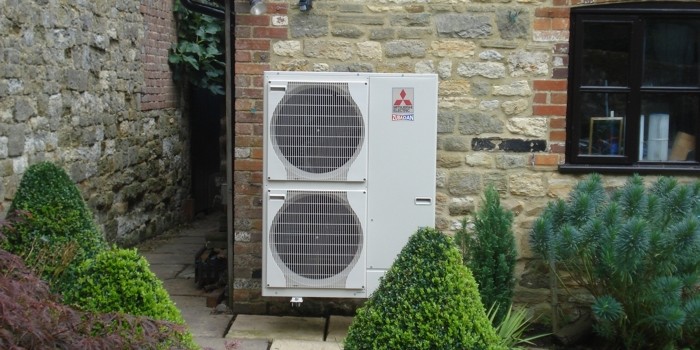
In addition to the insulation, there is also an air source heat pump, which despite knowing a fair bit about is actually a technology I have not yet lived with until now. Heat pumps are currently a very ‘in’ technology since there are generous government grants to cover a large part of the install cost of the unit – with the Government looking to incentivise households to make the switch from gas boilers.
They use electricity to run, and basically remove any latent heat from the air, compress it (which is what uses much of the electricity) to drive the temperature up further and then this heat is used to heat the home. Unlike gas boilers which can make really hot water (60-80 degrees), the water that a heat pump makes in much cooler (35 to 55 degrees), this is known as the flow temperature.
The flow temperature of a heating system is the temperature at which the heated water is circulated from the heat source (like a heat pump or gas boiler) to the radiators or underfloor heating. Typically because of the lower flow temperature of heat pumps, they tend to work much better when coupled with underfloor heating.
And often, when switching from a gas boiler to a heat pump, it may be necessary to upgrade the home’s insulation and heating distribution system (like installing larger radiators or underfloor heating) to ensure efficient operation and comfort.
It is this reason often that you hear the horror stories about heat pumps. Households are offered generous grants to make the switch. The installers are pushing the heat pumps on homeowners because they make good money from installing them, but unfortunately in many cases they just aren’t appropriate – the lack of insulation or the lack of an appropriate heat dispersal system (e.g. radiators).
The result is considerably higher energy bills – as the price of electricity is far higher than gas like for like. Unfortunately, this is made worse by the weather getting colder since the heat pump needs to work harder to get the flow temperature up to an adequate level.
So – coming back to my current property – lots of insulation, underfloor heating – so the heat pump should be a match made in heaven, right? Wrong!
In the first 18 days of January, I was charged £506.03 for electricity. As you might expect, on the basis that I work in the energy-saving field, the thermostats are turned right down, we have LED lighting everywhere, and generally, we run an efficient home – so imagine my shock when I received my statement from E.On.
Now, I briefly mentioned that heat pumps need to work harder in the winter. And to be honest even if we had a gas boiler in the house, I would have expected a higher bill in Jan, especially this year with it being so cold. The issue for me, is that people don’t do their research before installing heat pumps, especially when they are offered them free or with generous discounts.
There are two major metrics when it comes to heat pump performance – Coefficient of Performance (CoP) and Seasonal Performance Factor (SPF).
Coefficient of Performance (COP):
Definition: The COP of a heat pump is a measure of its efficiency at a specific moment in time. It is calculated as the ratio of the heat output (or cooling provided) to the electrical energy input.
Formula: COP = Heat Output (in Watts) / Electrical Energy Input (in Watts).
Context of Use: The COP is typically measured under specific, standardised conditions. It doesn’t take into account variations in outside temperature or other factors that might affect performance over time.
Interpretation: A higher COP means greater efficiency. For example, a COP of 3 means that for every unit of electricity used, three units of heat are produced.
Seasonal Performance Factor (SPF):
Definition: The SPF is a measure of a heat pump’s efficiency over a season. It takes into account variations in temperature and other conditions over time.
Formula: SPF = Total Heat Output (over a season) / Total Electrical Energy Input (over the same season).
Context of Use: SPF provides a more realistic and comprehensive measure of a heat pump’s efficiency in real-world conditions over a longer period, often a heating or cooling season.
Interpretation: Like COP, a higher SPF indicates greater efficiency. However, the SPF will typically be lower than the COP because it includes periods of less optimal operation, such as during very cold temperatures.
The issue is that there is no requirement for heat pump manufacturers to disclose the Seasonal Performance Factor (SPF) specifically for winter conditions. So, while on paper, a heat pump with a COP of 3 looks good (3 units of heat for every unit of electricity), which broadly brings them in line with the gas when comparing the cost per unit of electricity and gas – the issue is that when you need the heat (i.e. in the winter months), the actual efficiency of the heat pump is much, much lower.
This blog is just to make people aware of some of the pitfalls associated with getting a heat pump, however a few words of advice!
Some manufacturers voluntarily provide detailed performance data, including winter SPF, to demonstrate the effectiveness of their products in colder climates. This information is often found in technical datasheets or promotional materials, especially for models designed to perform well in cold weather. Make sure you check this out before getting the heat pump installed in your house.
Make sure you have a way of dealing with the lower flow temperature, so you need to replace old radiators with bigger new ones or even install underfloor heating.
Any questions – feel free to ask in the comments below!
Have you got a cold conservatory? Here’s how you can fix it!
June 13, 2022
A conservatory can be a great addition to your home, but it can also bring problems. It can be difficult to know how to heat it, and the fact it is built from glass means it doesn’t retain heat well. Aside from being expensive for your bills, and potentially attracting dampness, it is pretty frustrating not to be able to sit comfortably in a part of your own home. Too cold in the winter, too hot in the summer; it can be really difficult to reach a balance.
Obviously, glass is nothing as good at insulating as solid walls, so hot air can pass through the many windows easily, just as cold air can get in from outside. To be honest, although you can limit it by opting for double-glazed glass, some degree of heat loss will always be inevitable with a conservatory. There are things you can do to offset some of the problems though; we’re going to run you through a couple here.
Insulate your conservatory ceiling
A modern method of increasing the energy efficiency of your conservatory is to attach insulation to the inside of the roof. Clearly, you will lose some of the natural light entering your conservatory, but it will still come through the walls, and you will be able to create a more comfortable environment. Insulating drastically reduces the amount of heat that can pass through a surface, and because heat rises, ceiling insulation is a measure that can make a real difference. As well as keeping your conservatory warmer in the winter months, it will also stop some of the thermal gain from sunlight hitting your roof in the summer, meaning the room will not overheat.
How can a conservatory ceiling be insulated?
First, battens are fixed to the inside of the roof. Quilted foil insulation is then added between battens, and more battens are attached on top of this. Finally, it is all covered with plasterboard and skimmed with plaster, to create a smooth surface for painting. Ventilation must be added to ensure the insulation doesn’t encourage damp, by allowing condensation to collect between surfaces.
The insulation works as a barrier to prevent heat rising through the glass ceiling. In fact, the measure can reduce heat loss from the conservatory from 90% to as little as 10%. It also stops sunlight causing the room to overheat.
Install infrared heating
The main issue with conservatories is that their temperature is badly affected by draughts. Normal convection heating (i.e. radiators) heats the air, and this tends to disappear through the glass in conservatories. Because infrared heats via (safe) radiation instead, it’s easier to reach a certain temperature and maintain it. Infrared heat rays heat the fabric of the building, and its contents, directly.
Jigsaw’s Power heater range is a great option. It’s a stylish and discreet bar heater that is placed on the wall and will direct heat down and outwards, heating the floor, the furniture and you! As it is built using extruded aluminium designed to maximise thermal capacity it will stay warm and continue to radiate heat, even after the heaters are turned off. Available in four different power models: 1500w, 1800w, 2400w, and 3200w. You will feel radiant heat even if draughts enter the conservatory because infrared is a completely different, more direct form of heating. You can also get portable infrared heaters for extra boosts of heat when sitting there on a cold day.
It goes without saying that your conservatory will never be the warmest room in your home, but if you want to heat it, infrared makes the most sense.
Think we missed something? Do you have a different opinion?
Comment below to get your voice heard…
Air Source Heat Pumps are definitely not the answer!
March 30, 2022
It is clear from Government policy, that they are intent on pushing electric heating in homes in the UK. This is despite 85% of us using gas central heating systems to provide the heating for our homes as well as hot water.
The Government is looking to ensure that from 2025, new build properties are not allowed to be built with gas central heating systems. They are instead favouring ‘green’ alternatives like air source heat pumps. On the face of it, it is not such a bad idea, as homes will no longer be burning gas to produce hot water for heating and cleaning – so homes will no longer be producing the carbon dioxide associated with burning fossil fuels which is thought to contribute to climate change.
For us though, there are two major issues.
Efficiency of ASHPs is much lower during Winter
The first is the efficiency of air source heat pumps. The Government feels heat pumps are game changing technologies as they are highly efficient – at times converting 1 unit of electricity into 4 or 5 units of useful heat (so 400 or 500% efficiency), while a gas boiler might be somewhere around 90 – 95% efficient.
On the face of it, that makes it look a no brainer. A very efficient heating system that produces no carbon dioxide. The issue is that the efficiency numbers often cited in the media are not annualised figures (i.e. an average efficiency over the course of a year). They are cherry picking the peak efficiency – which occurs when the air temperature is in excess of 20 degrees.
Air source heat pumps work by taking latent heat out the air, and transferring this into a refrigeration coolant. The coolant is then compressed using an electrical compressor which drives the temperature up, and then a heat exchanger takes the heat from the coolant and transfers it to the hot water within a heating system. Regardless of the air temperature outside of the property, the coolant typically can get to the temperature required to run a heating system – but it just takes a load more electricity as the compressor needs to work that much harder when the weather is cooler.
It is true there is some heat in the air even in extremely low temperatures, however in order to drive the temperature of the coolant up to a useful level, the compressor needs to work harder – and remember the compressor works on electricity. This brings the efficiency right down potentially to 150% efficiency. So, while in the summer, efficiency of the heat pump could well be in excess of 500% (i.e. one unit of electricity produces 5 units of useful heat), this is certainly not the case when the temperature outside is hovering around zero.
Now if you think of the times of year when you typically run a heating system, it is during the colder winter months. This means that when the weather is cooler, the compressor works harder, and your heat pump will be what we often describe as an electricity vampire.
What we are saying is that when you need the heating, air source heat pumps are working at their least efficient.
As of 16th March, gas and electricity prices are at unprecedented levels.
The cost of a unit of gas is approximately 7.5 pence per kWh.
The cost of a unit of electricity is approximately 28 pence per kWh
But typically the ratio has stayed the same even when prices were much lower – a unit of electricity is approximately 4 times the price of a unit of gas.
If you gas boiler is running at 95% efficiency, it is going to cost you right now about £0.07 per unit of useful heat.
In the winter, when the air source heat pump could be running at 150% efficiency, it is going to cost you £0.19 per unit of useful heat.
So no emissions in the home, but more than twice as expensive to run!
ASHPs are powered by electricity that may still come from burning gas
The other issue with electric heating systems is that while they produce no in home emissions, most of our power still comes from gas power plants. So, it is likely that gas was burnt to produce the electricity needed to run the air source heat pump anyway!
Obviously there has been huge investment into renewables like wind turbines, but if the wind doesn’t blow, much of our power still comes from fossil fuels.
I think there are a few points worth caveating though. Firstly, ground source heat pumps are a different story. They have a very similar efficiency all year round – approx. 450%. However, they are extremely expensive to install.
If you do go for a heat pump, it does infer that your house is sufficiently insulated (their working temperatures are far lower than gas boilers), so that in itself will see you have lower energy bills that an uninsulated equivalent property.
Are Fire Pits Bad for the Environment?
May 5, 2021
As summer approaches, most people are enjoying spending more time outdoors. While many of us dream of an alfresco dinner, we are often let down by good old British weather. A run of warm weather can quickly be replaced by a snap of unseasonably cold weather even in the middle of the summer. While many people at this point will give up the idea of sitting outside, more and more households are turning to outside firepits and heaters to provide the extra warmth to allow them to battle the colder weather.
In this article we are taking a look specifically at fire pits; what they are as well as the impact they can have on the environment and your health.
What is a firepit?
Essentially a firepit is a controlled open fire, typically using wood as a fuel source. There are lots of different types of fire pit, but the principal is the same – once alight, they provide a nice source of heat to those in the immediate area. In some cases a grill can be added to a firepit allowing you to use it for outdoor cooking – essentially a rustic BBQ!
While firepits provide a nice source of heat and also can look really nice, there are a few common issues associated with them – firstly they are a potential fire hazard, especially if left unattended. As firepits are normally open, they are also a risk for children who may be playing in the nearby vicinity. The final issue relates to the pollution – burning wood as a fuel can have a big impact on the air in the surrounding area.
Why are fire pits bad for the environment and your health?
When burning wood in a fire pit, it is constantly releasing smoke into the air surrounding it. Smoke contains many harmful elements including carbon dioxide, carbon monoxide and methane. These pollute the air that you breathe, and damage any trees or vegetation nearby. They are also all greenhouse gases which are a main factor of climate change.
In populated areas like London, the use of fire pits can actually be reported as a nuisance. The government has decided this as smoke can cause serious impacts to the environment and health of residents in the area. Gardens are situated closer together than in the countryside, meaning fire pits are more likely to affect neighbours and passers by.
Many respiratory problems are associated with inhaling smoke and pollutants, and it can affect your overall immunity and existing health conditions. Smoke is particularly dangerous to children’s health as they are still in development and breathe in a larger amount of air than adults.
How to make your firepit environmentally friendly
Your fire pit is never going to be completely environmentally friendly, as there is no way you can prevent it from emitting smoke, however we would always recommend buying low emission firewood.
Typically the best type of wood to burn is seasoned wood – that is wood that has been allowed to dry out so the moisture content is below 20%. Provided wood is stored in a dry place, over time the moisture will evaporate – this is the process of seasoning.
It is possible to buy kiln dried wood – this is essentially where the natural drying process has been sped up by the use of large industrial kilns.
Burning seasoned wood in the firepit is really important for two reasons – firstly dry wood burns hotter, so the firepit provides more heat. But secondly and potentially more importantly, wet wood (normally any wood with over 20% moisture content) produces more smoke when burnt as the moisture causes incomplete combustion.
If you have a firepit and don’t have access to a log store (where fresh logs can dry out) we recommend looking for kiln dried wood as it will arrive at your home ready to burn. The most environmentally friendly firewood on the market is kiln dried hickory, or kiln dried oak. Although these are not found in most shops, they can be bought online.
Alternative outdoor heaters to fire pits
Apart from fire pits, you can also heat your garden with infrared heaters and gas patio heaters. Electric heaters will obviously not produce any local pollution (although require electricity that may be produced by unclean means – i.e burning gas / coal) – so if you are looking for the most environmentally responsible method of surviving the cold British summer we would recommend this is potentially the way to go – although you won’t be getting the same campfire experience, but you may well feel less guilty about the environment!
In conclusion
Your love of spending evenings outside shouldn’t have to stop because of the environmental issues related to using a firepit. However, if you do use one, always go for seasoned wood with a low moisture content so the fire burns hotter and cleaner.
If you aren’t too bothered about the open fire look, then an electric heater will also do the job and have the added benefit of normally being safer if you kids around as the heating elements are normally quite high!
If you feel that you can fight the cold by throwing on some extra clothing then even better – this is the only completely non polluting method of staying warm in the cold!
Converting my shed into a home office
April 15, 2021
One of the major results of COVID-19 has been the huge increase in demand for home offices. With more and more of us working from home, the home office is the perfect solution to help separate home life from work life.
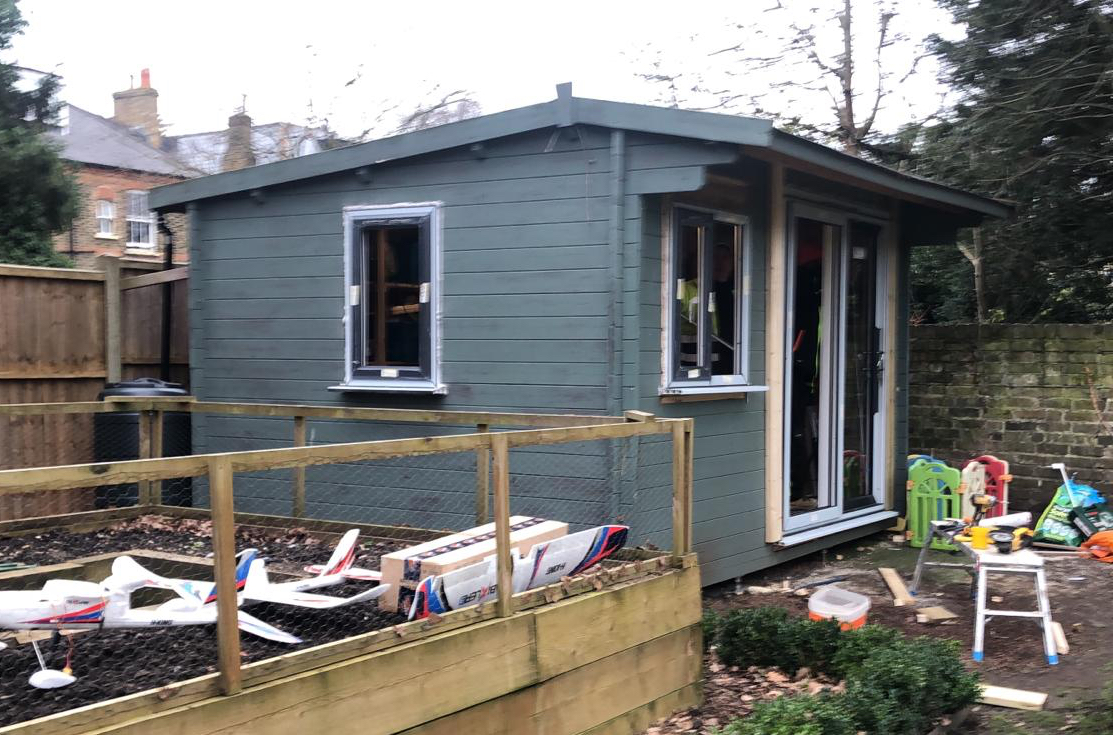
One of the major stumbling blocks with a home office though is the cost – with a brand-new office costing anywhere form £7,500 and upwards. Much like many other UK businesses, we have also been hit hard by COVID and as a result I am working from home more and more, so I thought I would see if it is possible to create a home office from my garden shed.
The plan was to convert the shed in two stages. The first was to work on the outside of the shed, insulating externally (and in the end I also needed to replace the roof), so it is weatherproof and can be used effectively as an office even during the coldest winter months.
The second stage, which I will do in the spring is to get the inside of the shed up to ‘office’ standard, so plasterboard, spotlights in the roof, new floor and insulate above the ceiling to get that final office feeling!
Below is the shed before I started!
In this blog I am going to go through the stages I went through to get the loft weatherproof and insulated. I am very grateful to EWI Store for providing the materials at a fantastic price (A little plug there but genuinely they were great!) and EWI Pro, who manufacturer the materials for their patience and technical expertise.
Preparing my shed retrofit
My first step was to get a bit more light into the shed. In order to do this, there were two steps – add an additional window on the side of the shed and take out a tree in front of the shed that was becoming slightly overgrown and blocking lots of light through the existing door and window. Before you say what a terrible person I am for removing the tree, it has been replaced by two, more manageable trees!
In addition to the new window on the side, I was going to replace the existing door and window already in the shed. I bought a sliding door and two windows from B&Q to achieve this. The sliding door replaced the shed’s ‘french doors’ and this was purely an aesthetics thing from my point of view and also my daughter has a new habit of getting fingers trapped in swinging doors. The hope was that by replacing all the glazing, the new sets would all match and look rather smart on my new home office as well as being far more energy efficient than the existing glazing.
In terms of actually replacing the windows and doors, the only real issue I faced was the fact the walls of the shed weren’t actually perfectly vertical, so I had to put the door in square (using 2×4 timbers) and then when it came to installing the external wall insulation, I used the foam adhesive on the back of the insulation boards to ‘straighten’ the walls.
As you can see from the photo, the overhang at the front of the shed was pretty big and although harder to see in the photo, the same is true at the back, so plenty of space to house lots of insulation. Even on the sides the overhang was 80mm so enough to squeeze a bit of insulation in!
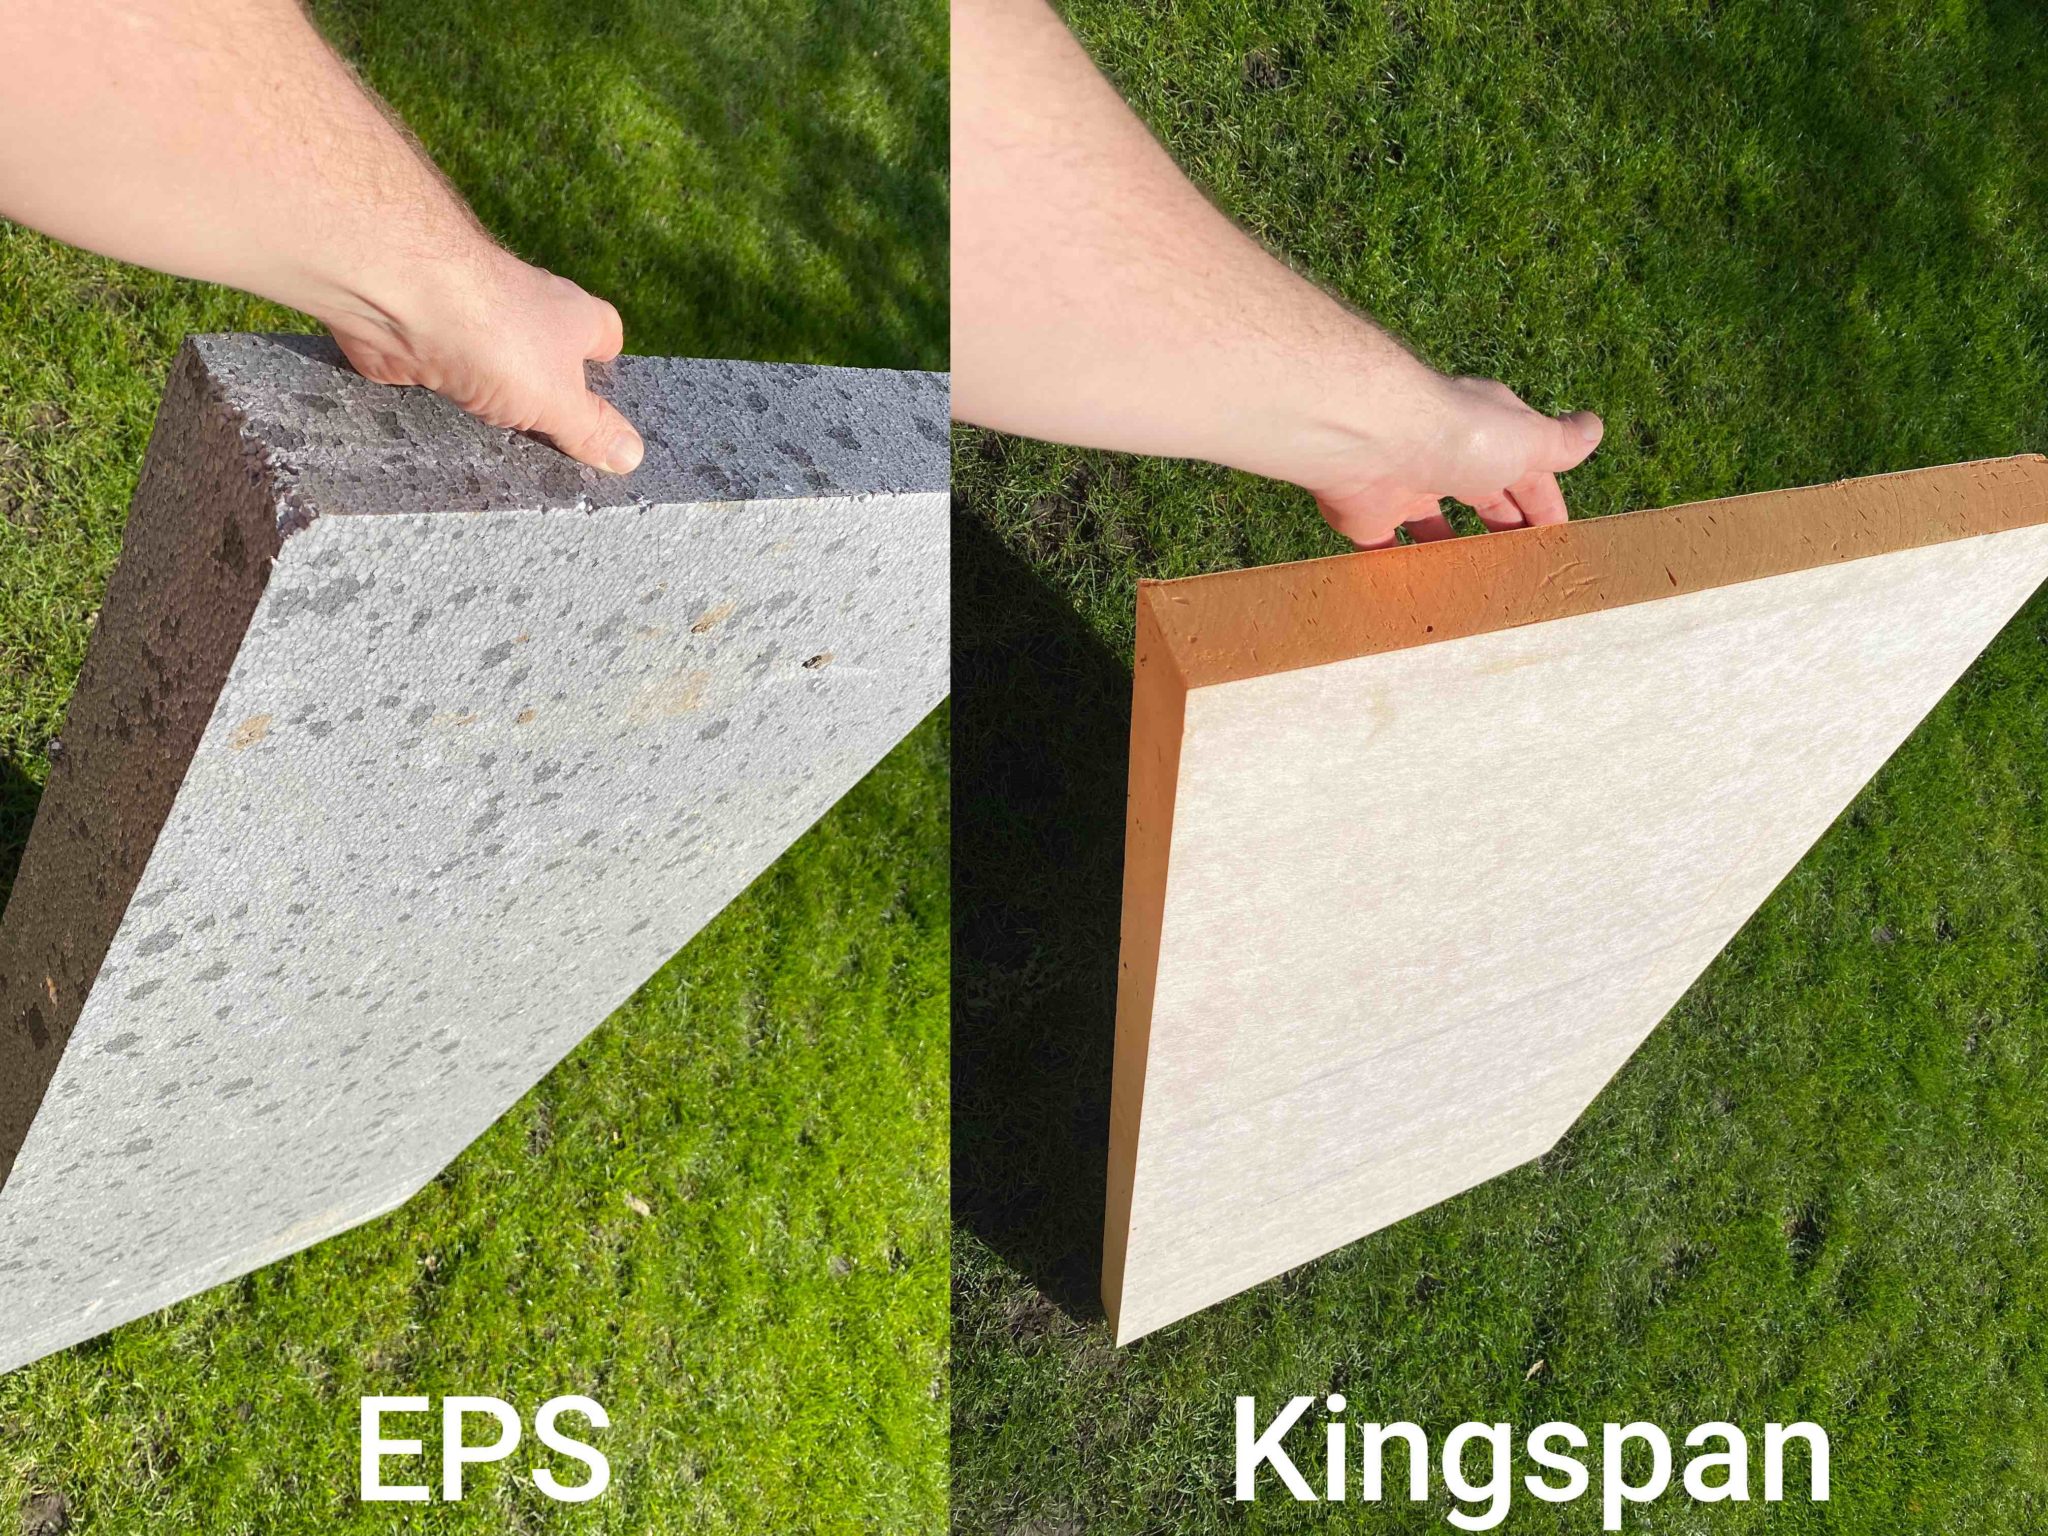
Now when it comes to insulation there are lots of different types, expanded polystyrene (known as EPS), Kingspan k5 (like phenolic insulation), Rockwool (mineral wool) and even cork and wood fibre. In order to make this conversion as cost effective as possible I was planning on going with EPS all around the office. EPS provides a nice balance between price and thermal improvement. Kingspan is used where space is a premium because it has a lower thermal conductivity than the EPS, therefore is a better insulator – meaning you can use less of it to achieve the small thermal performance of the EPS.
Rockwool is used typically because it is A1 fire rated, so if this were going on a house, I would probably opt to use that, however both Kingspan and Rockwool are more expensive than the EPS, so my original plan was to use EPS to keep costs down.
In the end, I had to use a mix of EPS and Kingspan because of the overhang on the sides of the shed / office. The overhang only let me have maximum 80mm of space to work with, without having to extend the roof line, so bearing this in mind, I decided to use 60mm Kingspan on the sides (the pink boards) and 100mm EPS on the front and back of the office (the grey boards). The u-value of the finished walls were less than 0.30w/m2k – a significant improvement on the average shed and probably an improvement on most offices in the UK!
Now you might question why I didn’t opt for internal wall insulation on my shed, and this was purely down to space. The internal dimensions were relatively small so I didn’t want to lose any of that internal foot print by applying the insulation internally. It would definitely be an option though, but by applying the insulation externally I could also modernise the look the office as external wall insulation is typically finished with a render finish.
Insulating my shed externally
The insulation is stuck on to the wooden walls using a spray foam adhesive. Typically if applying external wall insulation to a solid brick wall, a cementitious adhesive is used, but in my case, the foam adhesive was sufficient – it also allowed me to ‘straighten’ the walls by putting more adhesive towards the top of the wall and less down the sides. The insulation boards were interlocked at the side and prior to applying any boards – I screwed a ‘starter track’ to the wall which acts as a supporting plinth on top of which you can install the insulation boards. It is really important to try and minimize the gaps between the insulation boards – since these gaps will be filled with basecoat (another cementitious product) when this is done and you can get significant thermal bridging, where heat loss occurs at a vastly quicker rate than through the insulation.
Once the insulation boards were stuck on and level (which took the best part of a day to do!), I put through mechanical fixings to tie the insulation boards to the wall. These were large grey washers that you put a wood screw through and this helps tie the insulation boards to the wall.
Installing basecoat & mesh (scrim coat) to my shed
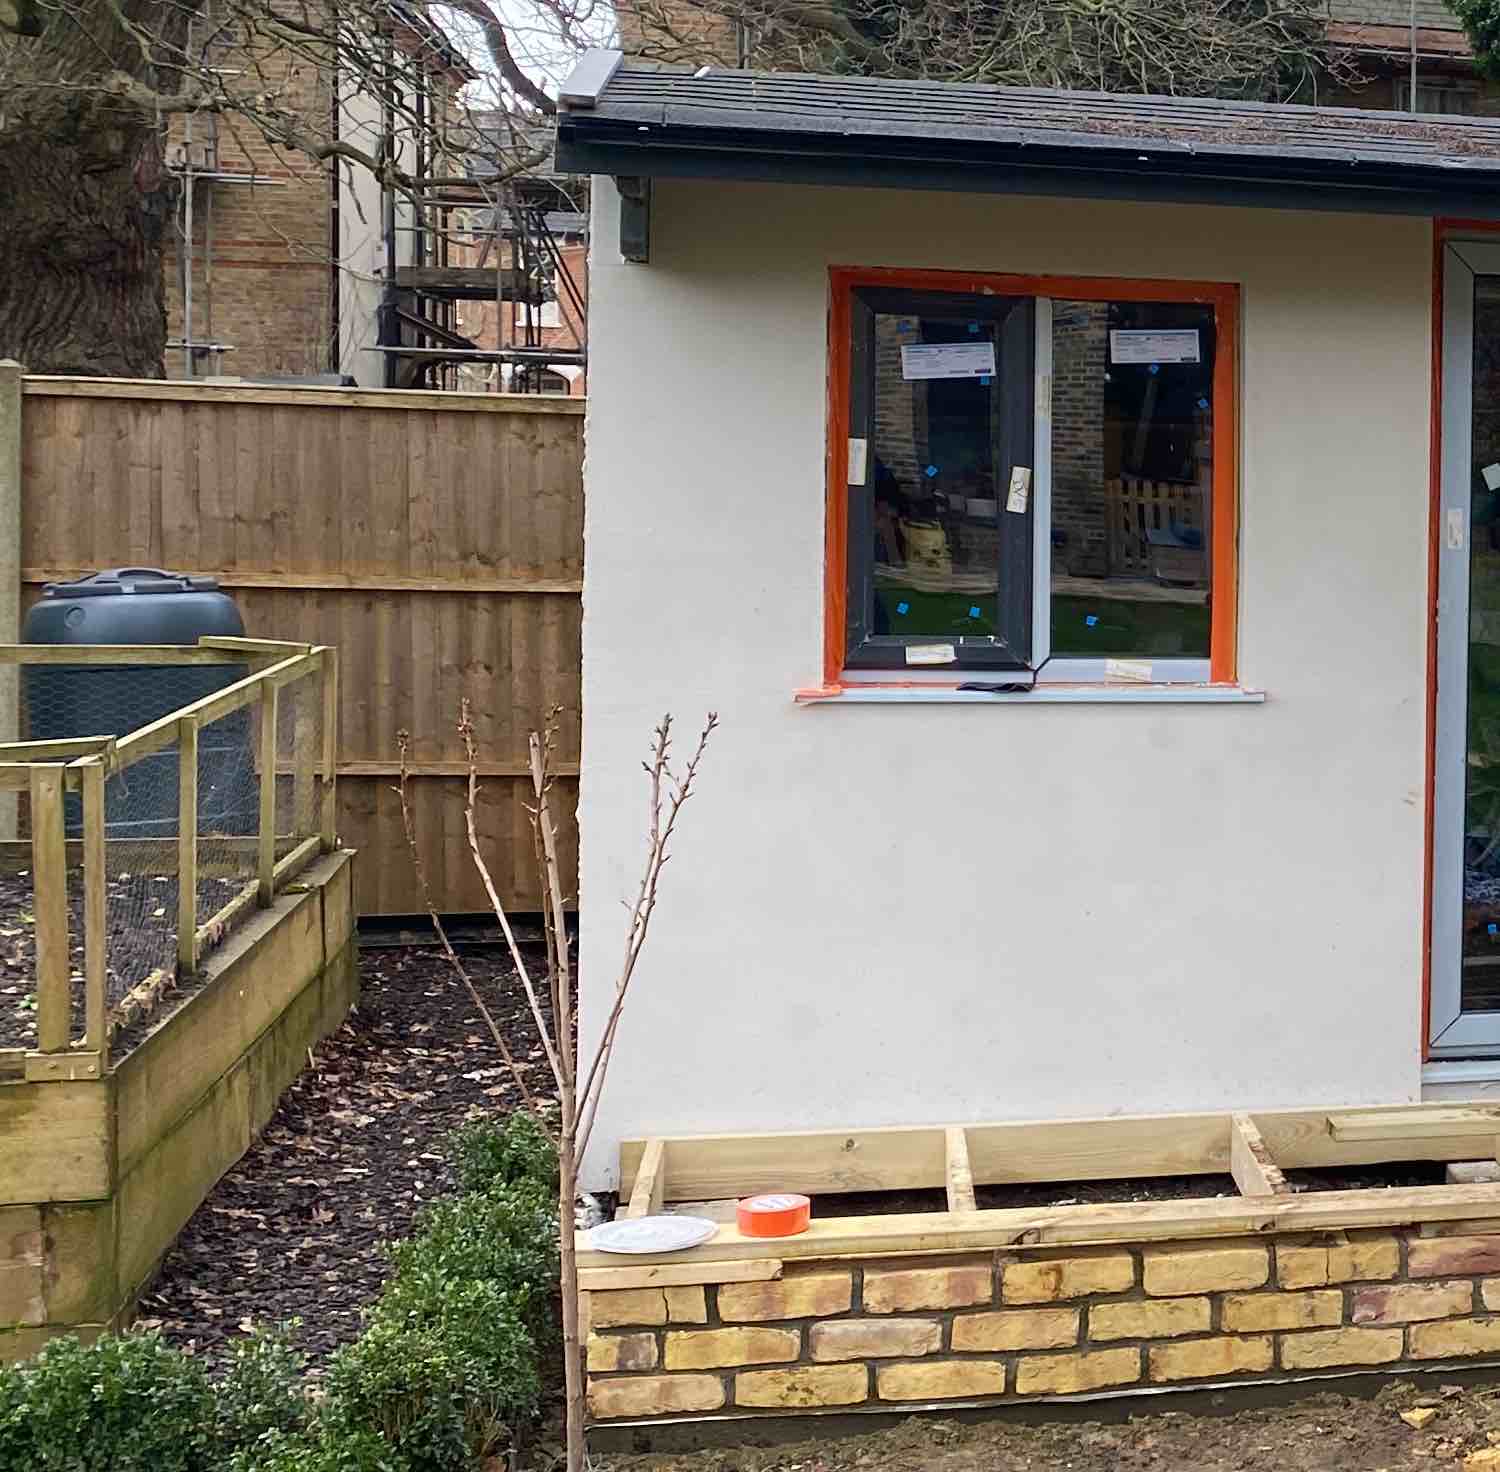
The next part of the process is to install the basecoat layer – this is basically the cement layer (about 6mm thick) that protects the insulation. With all thin coat render finishes, I was told this part was absolutely critical to ensure I could achieve a nice finish to the render because the final render coat was just 1mm thick. I did contemplate getting in the professionals at this stage – this is notoriously the stage that goes wrong with external wall insulation, but again in an effort to keep costs to a minimum I decided to have a go myself. I have done a bit of plastering in the past, but this was something quite different (again thank you to EWIPro for all the tips!). Using a notched trowel you need to apply the basecoat to the top of the insulation boards and then sink fiberglass mesh into the basecoat. The mesh conveniently is marked at each end showing the exact overlap that should be achieved. In fact the whole process is quite fun although quite messy and quite a lot of the product ended up on the floor. I applied the basecoat in two passes to try and get it really flat.
In the photo you can see the basecoat layer applied – you can also see the start of a decking area I created at the front of the shed! I decided to do this for two reasons – firstly I have this image in my head of me working in the office and my dog sitting on a decking out front!
Secondly, this area never seems to get any sun so grass never grows directly in front of the shed. I thought by bringing out the decking area by a 1.5m of so I might get around this issue!
It was once I had basecoated the wall that I noticed a leaking roof, so spent a day replacing the roof ‘felt tiles’ with new ones, again something I hadn’t costed into my shed to office conversion although the materials for this only came to £170 – the pain here was it took just under a day to replace the roof tiles.
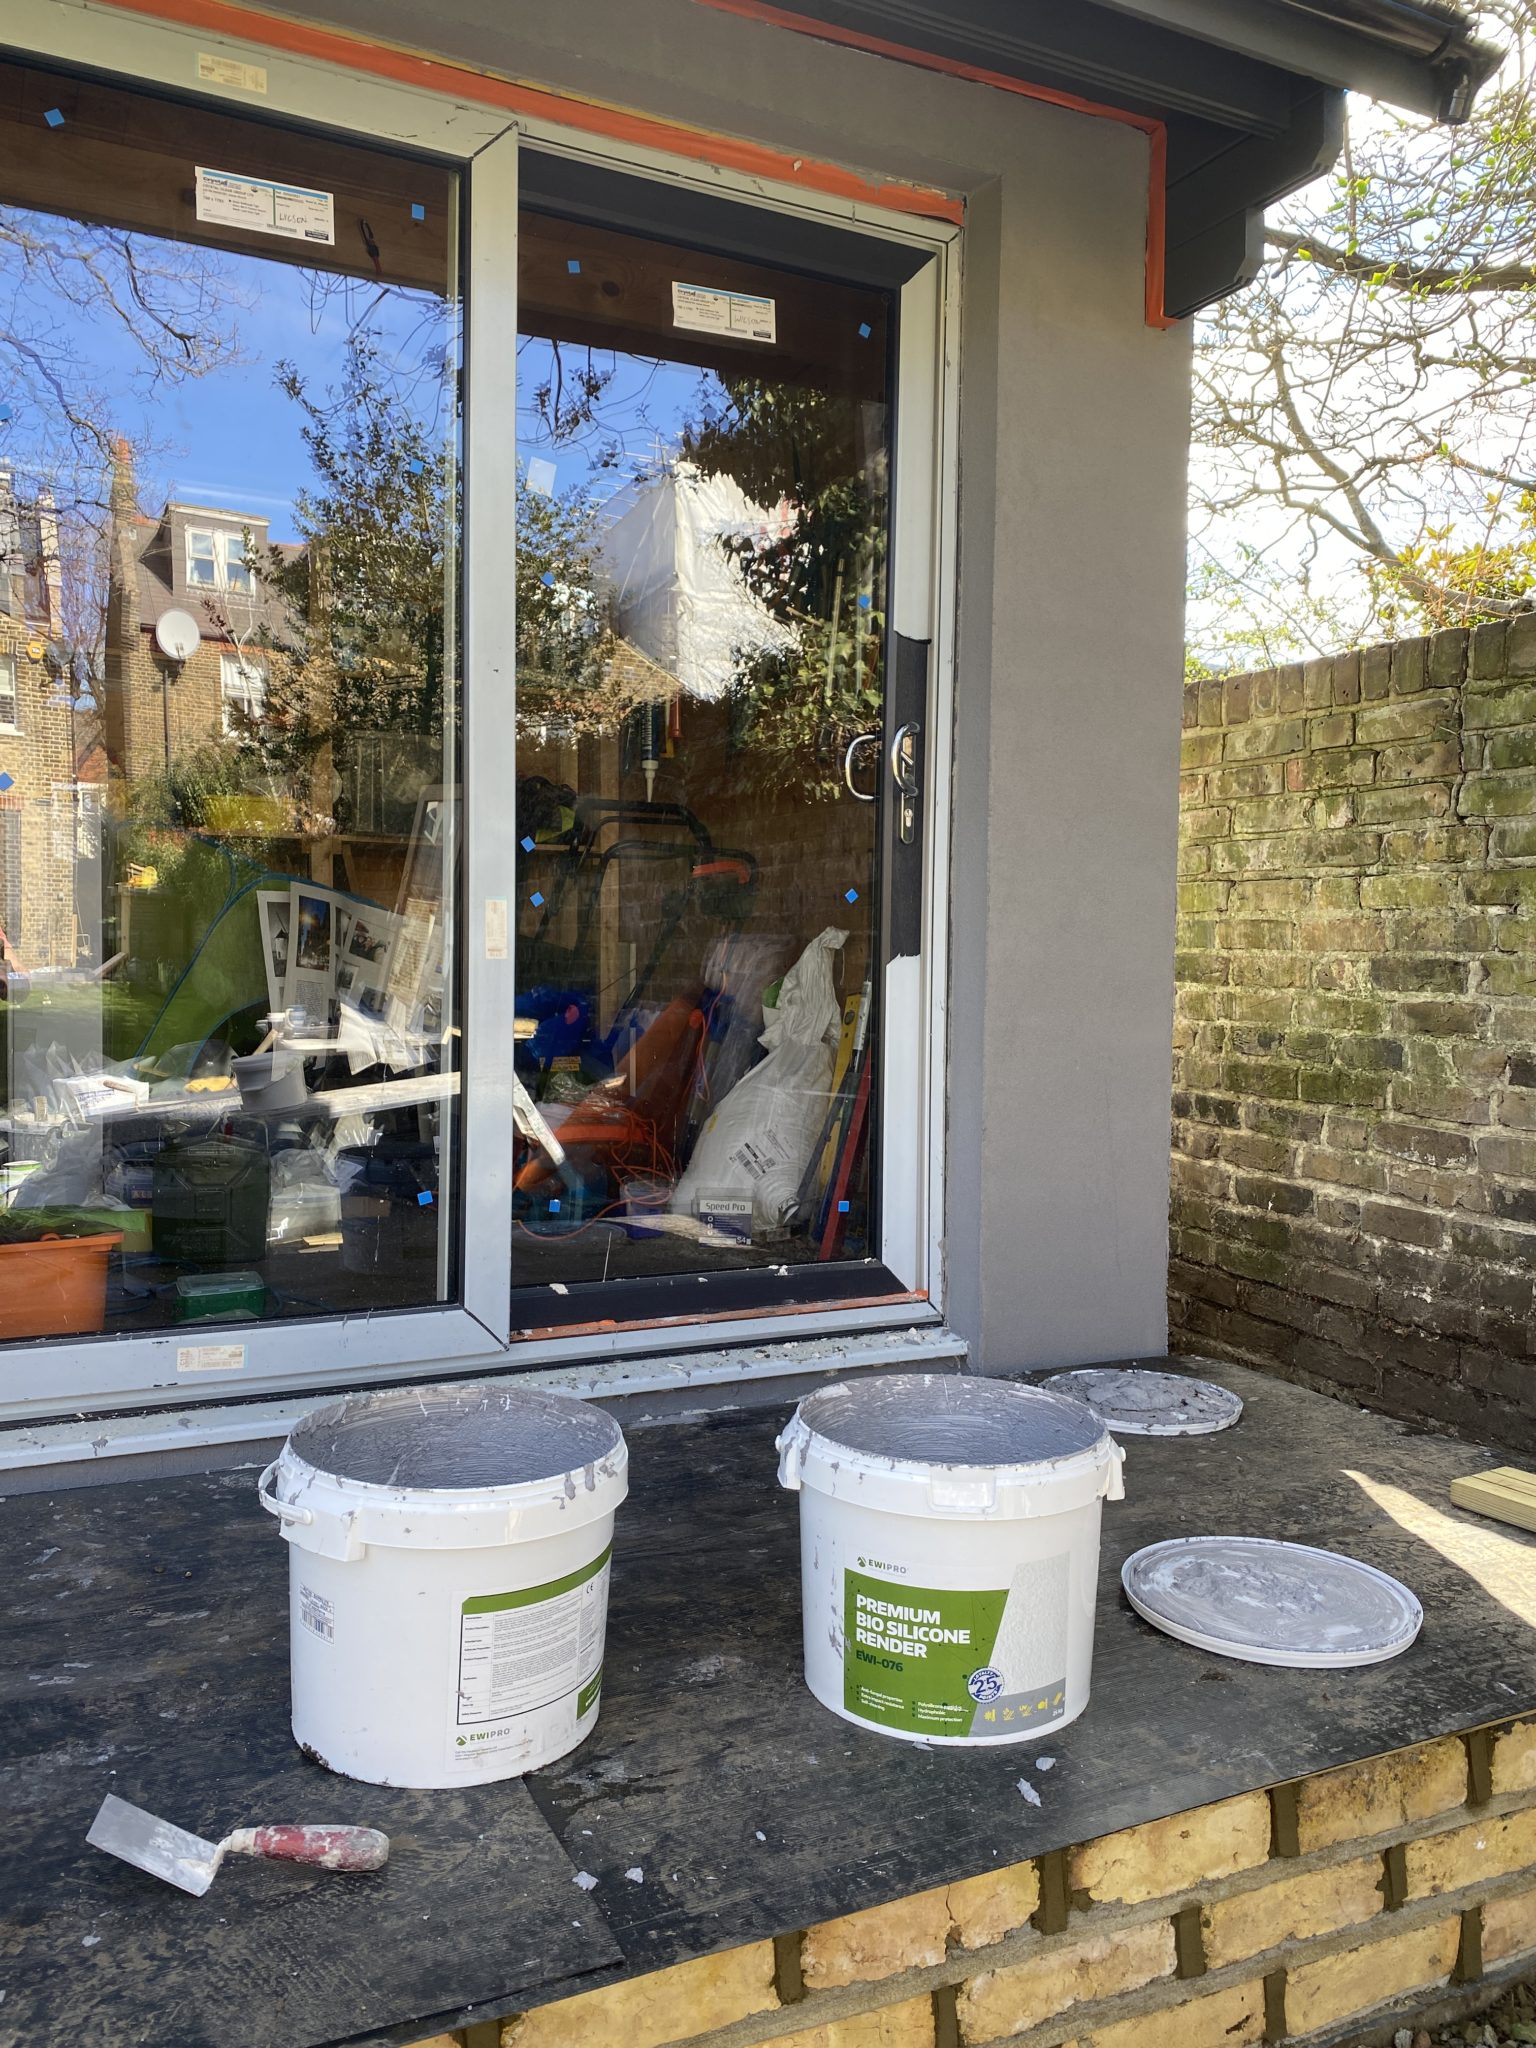
Topcoat Silicone render application to my shed
Once the roof was finished and the basecoat was applied, it was time to apply the render – this was the Premium Bio Silicone Render 1mm and I opted for a ‘Lead’ colour as I thought this would compliment the windows although it is available in any colour as it is simply tinted (much like paint).
Unlike the basecoat that you can remove if it dries (although it is a bit of a challenge), if the render gets on the windows and frames and dries it is very difficult to get rid of. Therefore I used window film protector to protect all the openings against accidental spillages.
I applied the render itself with a metal trowel and then used a plastic render float to get the final finish which actually come up really nicely.
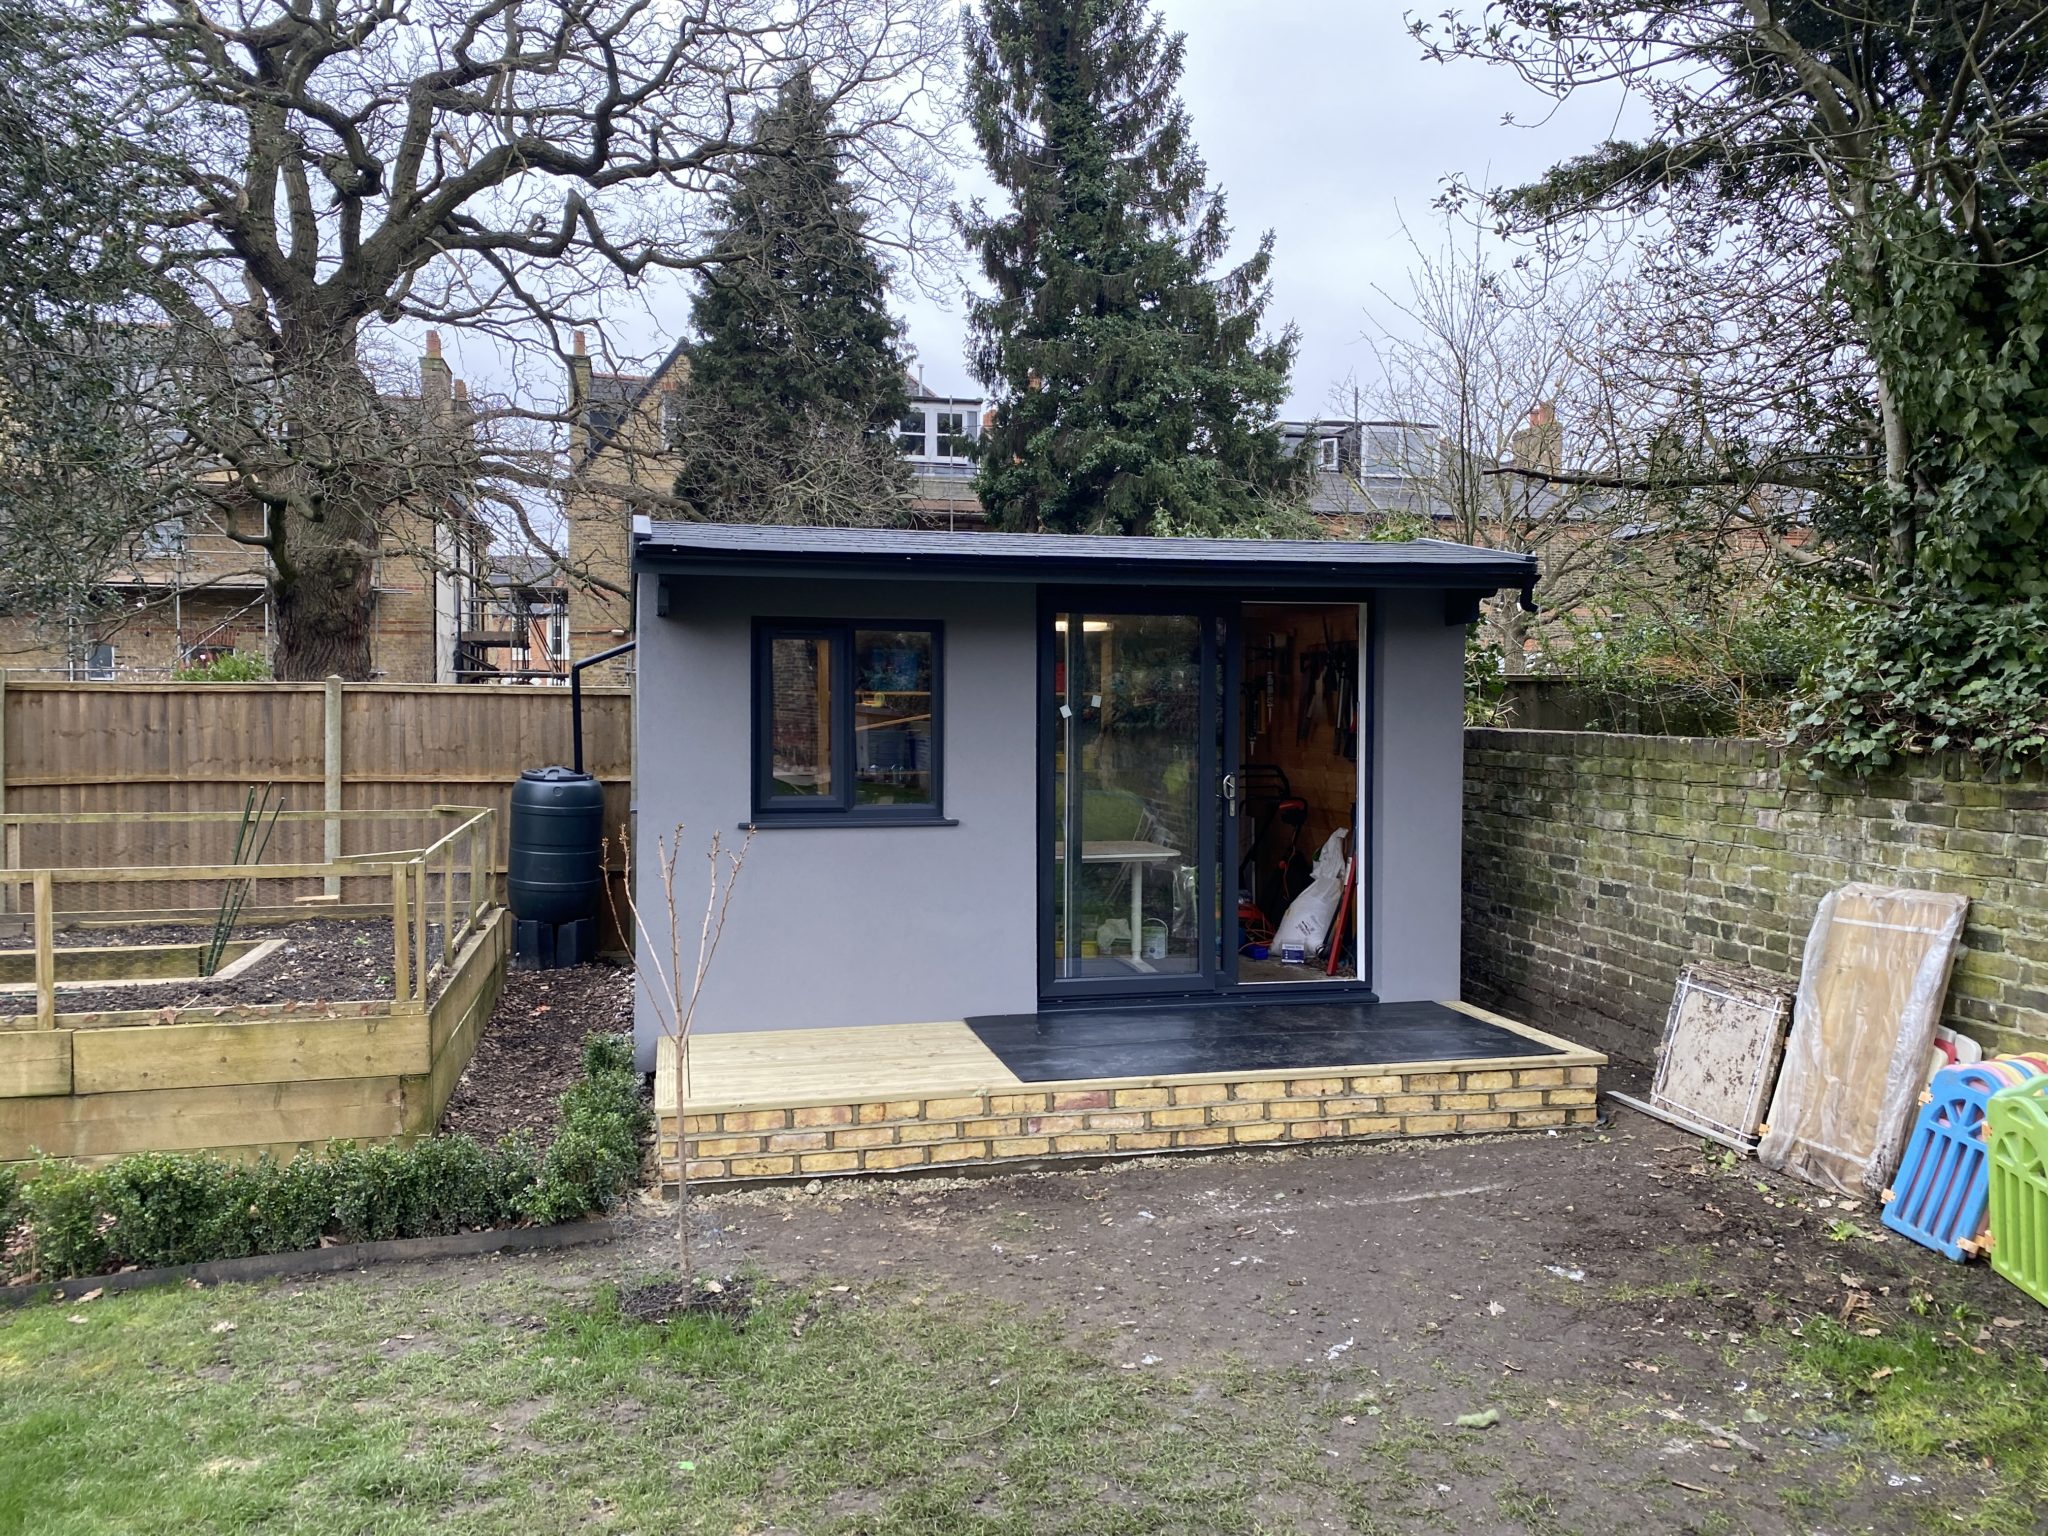
As you can see from the photos, my new office looks pretty good (in my opinion) but more importantly it is very well insulated meaning that those cold winter days should be an issue.
If you are interested in trying to re-create what I have done here, go to the EWI Store website and use the code ‘Shed12’ to get 12% off the cost of materials!
Resources I used for external installation of my shed:
I will follow this blog up in a month or two when I do the inside of it and complete my shed to office conversion!
How to Save the Planet with the Clothes You Wear
March 17, 2021
The production of fashion accounts for 10% of the worlds carbon emissions. Clothing is a big part of our daily lives, however in retrospect it is an even bigger part of the climate emergency happening right now.
For you to make an individual change might not seem like it will have much of an effect, but by doing your bit, you will help achieve a positive result for the environment. Join us in this blog looking at some of the ways we can make that positive impact!
Buy less clothes to save the planet
I know it may sound obvious, think carefully before you buy something. Have you ever bought something, never worn it, and after a few years of it hanging alone in your wardrobe you decided to get rid of it? Well, this is a major problem contributing to the environmental impact of clothing. Each year, 85% of textiles goes to the dump. Nearly all of these textiles are in perfect condition, or salvageable, which makes them almost pointless to throw away for the climate’s sake.
Next time you go shopping, make sure you are not going to regret buying anything, and if you do, make use of the shops return policy!
Sustainable brands are the way forward
Did you know, some clothing can be made from recycled plastics? Yes, it can! Some high street brands are using their platform for good and selling sustainable clothing. High street brands such as H&M, Urban Outfitters and ASOS are all participating in this, and you can easily find their sustainable sections on their websites.
Sustainable clothing also lasts longer in most cases, with eco- friendly fabrics being softer and stronger, sustainable clothing can guarantee you won’t have to keep buying new clothes.
Buy better quality clothing to save the planet
You get what you pay for – cheap clothing will fray, tear and get old quicker than good quality clothing. More durable clothing will mean that you won’t need to replace your clothes as often. Most of the time good quality, durable clothing is expensive, however you need to be thinking of long-term benefits.
Also, better quality can also be sourced locally. If you live it the UK or the United States, there are many local brands you can choose from. Avoiding buying clothes from halfway around the world will save a lot of potential carbon required to transport them into the countries that sell them.
Learn to sew to help the planet
Get that sewing kit out! So many clothes can be repaired with a simple stitch, and other textiles can be used for different purposes (in my house we use old t-shirts to get marks off the car with!). The thing is, sewing is such a cool skill to pick-up. How many of your friends can boast about knowing a great craft like this.
Also, linking back to buying less, if you regret purchasing a certain garment because it doesn’t fit properly, then have a go at making it fit. Give yourself a bit of a challenge! You can take dresses, trousers, shorts, etc up just by cutting them to the desired length and hemming – good as new!
Another option, if you aren’t so good with sewing, is to donate the clothes. You can take them down the local charity shop, or sometimes schools and local community organisations will offer to donate your clothes to people who need them. Anywhere is better than throwing them away.
Second-hand shopping
Fast fashion is a term used to describe the latest trends, produced at a low cost by mass market retail organisations. It is affecting the environment at a rapid pace, due to the majority of its products being thrown away by the consumer. The production of fast fashion uses masses of energy, water and increases the emissions of greenhouse gases significantly. Therefore, fast fashion is damaging the environment. ‘Slow fashion’ might be the future, but how can we stray away from investing in fast fashion when we see in display every time, we walk down the high street?
Well, in an aim to combat fast fashion, many shoppers are sacrificing the luxury of brand-new clothing and turning to second-hand shopping as an alternative. Essentially boycotting fast fashion organisations, and with a little help from Covid 19 shutting the shops (an unintended consequence), we have seen a major increase in the second-hand retail industry.
Second-hand shopping is becoming quite popular with the ongoing improvement of technology. Apps and websites such as eBay and Depop are allowing you to converse with people all around the world about old clothes.
From a personal experience, I use the Depop app almost every day to browse clothes and accessories. The app tailors its features to your own preferences, and some users agree to swap clothes if they like what each other are selling. This makes second-hand shopping very easy and almost like you are browsing in a real-life shop!
Additionally, there are many clothes that you only wear for a certain amount of time, like pregnancy clothing. These clothes can be sold, bought or swapped within second-hand shops and websites, instead of being thrown away, or buying brand new.
Of course, there are always charity shops, and busy places such as London offer various places to go ‘thrifting’. However, the online second-hand world offers much more in terms of ease and efficiency.
The environmental impact of laundry
One last thing to consider when being eco-friendly with clothing is how you do your laundry. When you wash your clothes, the average washing machine uses 19 gallons of water per load. So, you need to make sure the water is not wasted!
Here are a few ways you can make sure your laundry routine is eco-friendly –
Make sure you are washing full loads and not just a few socks. By organising your washing for a few more minutes, you could turn two loads into one. This means you will be using half the amount of water, therefore helping the environment and saving on your water bills!
Invest in an energy efficient washing machine. These are designed to reduce the amount of energy and water they use when washing laundry. Up to 80% of water can be saved, and they can result in up to 65% energy savings. Also compared to standard washing machines, they have the benefit of being able to wash more laundry in one go.
Try not to wash your clothes after one wear – over-washing clothes can result in them degrading quicker, and if the wash isn’t needed, then nor is the water.
Use green detergents – you can buy environmentally friendly detergents, which consist of no harmful ingredients. In most normal detergents, the harmful ingredients (synthetics, silicones, etc) get washed down the drain and eventually into the ground or the sea.
Wash with cold water. Heating water uses much more energy, and you’ll find that some of your clothes require washing at lower temperatures, in order for them to stay in good condition.
Take advantage of the sunny days, and don’t use a tumble dryer. I know it is hard to refrain from using the machine that does the job for you, but taking the time to hang the washing on the line, or using airer’s in the colder times will save you so much on your energy bills, and will be another step in helping the environment.
Avoid dry cleaning. Dry cleaning involves the use of very harmful chemicals, which are toxic for the environment. So, by avoiding the dry cleaners, you will be saving the environment instead of quite literally killing it.
How to Save Water for your Garden in the Summer
March 4, 2021
We are now entering another Summer, and if this year is anything like last year it’s set to be a scorcher! With those sunny and hot days to come, water then becomes an even more precious commodity, especially if we have a nice sized garden at our disposal.
We all want our lawns as green as they can be, and our flowers to bloom, so that we have perfect gardens for the summer. We may also use our gardens for paddling pools or other water activities to help us enjoy the sunshine whilst staying nice and cool.
But how do we do these activities whilst saving water as well? Also, how do we still have fun, without racking up massive bills on our water meters?
In this article, we have discussed some ideas on how you can start considering saving on water for your garden.
What is the best way to water your garden?
What we think about sprinkler systems
It is easy to understand why sprinkler systems are a popular garden favourite. They allow you to sit back and relax whilst they do all the work, however it often results in a substantial waste of water. Sprinkler systems are an inefficient way to directly water your plants, given the likeliness that they are most likely to sprinkle everything else other than the things you want them to.
Are water hoses water efficient?
A garden hose, on the other hand, is a very direct method of using the water as you get to choose where the garden is watered – depending on which plants need the most water, and where there is the most vegetation that requires it.
However, these can still contribute to water loss, but not as much as a sprinkler system. Water losses can happen at the tap to hose connection or at the nozzle valve.
Are sprinkler hoses any better?
So, what doesn’t waste water? Well, a sprinkler hose combines the above two options, and helps you use just the amount of water you need in a targeted area.
However, if you are looking to go a step further in your quest for water efficiency, then a water butt could be just the solution you are after.
What is a water butt?
A water butt is designed to collect rainwater, so you can use it when needed, provided it has rained enough and you have collected some. We have the advantage of rainwater being completely free, so it would be stupid not to use it! You can easily connect your garden hose to the water butt, or if you prefer you can fill a watering can. A standard 210L water butt takes around 1-2 months to fill up, so you can leave the water butt to fill up in the winter and it will be ready for the hot summer months when plants need watering most!
Choose the right plants to save on water
Did you know that some plants do not need watering?
It’s true, you can choose to fill your garden with plants that will bloom all by themselves.
They may need a little nurture now and again, but these plants can survive long periods of time without water, even in very dry climates.
What are some of our favourite water saving plants?
Black-eyed susan – These sunshine yellow, daisy-like flowers can grow between 30-100cm tall. They grow with coarse hairs that help trap moisture, meaning they can flower in very dry conditions.
Verbena – If you are looking for plants that will thrive in full sunlight, then Verbena is what you need. Even in very dry, arid environments, this plant thrives and can flower up until late autumn.
Lavender – This plant loves heat and rarely needs watering, so will be a great addition to your garden, and will give a relaxing aroma too!
Cosmos plants – These flowers seem to thrive in water deprived conditions, by flowering more the longer you neglect them.
Coneflowers – They usually grow in dry grasslands and can grow up to 4ft tall. Coneflowers will grow well even if you forget to water them.
Stonecrops – These plants have leaves that store water, meaning they can cope by themselves for a long time.
Blanket flowers – They can survive with only occasional watering and can cope with extreme heat.
Flowering globe thistles – They grow best in dry soil and love hot summers. You only need to water them occasionally when they are growing.
Bougainvillea shrub – This is one of the best flowering shrubs that can survive in a low water environment. They are popular in hot climates such as the Mediterranean and California. It produces a spectrum of vibrant colours so will definitely brighten up your garden.
Yarrow – It grows well in dry and damp areas of soil, thanks to the hairy stems that help them in rain deprived conditions.
Succulents – The leaves store water which allow them to grow on their own without water for a long time. Lots of people choose to have succulents as house plants, but they can grow outside as well.
Artificial grass saves a ton of water!
Another way you can avoid watering the garden, is to swap your lawn for artificial grass. Although it is not the best when it comes to the environment, from a water saving point of view, it is worth considering! For my own lawn, it costs approximately £5.26 for each time I water it. So, by switching to artificial grass you will be saving a lot on your water bills.
You can get artificial grass fitted by a professional, or if you are only looking to cover a small area, you can buy it from local garden centre, hardware shops, and even Amazon.
Invest in a covered pool or hot tub to save on water
How many times do you fill the paddling pool up in the summer? Wouldn’t it be useful to have a pool that you don’t have to refill as often? By investing in a more durable pool or hot tub, with a cover you can keep the water store in them for round 4 weeks, depending on how much you use it. This can be an expensive option if you choose a high-end tub, however there are lots of affordable choices out there, compared the high-end pools and hot tubs.
The Lay-Z-Spa hot tubs are recommended by many people across the UK, and they are priced at around an average of £200-£800.
A cultural change required to save water
Sometimes, all you need to change a bad habit is to change one’s mindset. If you are looking to save on water, we promise this won’t take much effort on your part to do so. Reconsidering if you need certain things can result in a positive outcome. Ask your self the following questions:
Does your lawn need to be greener than your neighbour? Do you really need a state-of-the-art swimming pool to spruce up the garden? Is it a problem if you don’t have to fill-up all the available space with flowers, but choosing to be more selective where they are planted?
These are all things worth considering when thinking about trying to save water.
Clean Heat Grant to Replace the Renewable Heat Incentive
March 2, 2021
What is the Renewable Heat Incentive?
The Renewable Heat Incentive (RHI) is a Government schemethat was introduced in 2011 to replace the Low Carbon Building Programme. Its aim is to encourage people to invest in renewable forms of heating, by paying them for the renewable heat they produce. The commercial segment of the Renewable Heat Incentive has been running since 2011, and the domestic part started three years later in 2014.
The renewable technologies that the RHI covers are biomass boilers, air to water heat pumps, ground source heat pumps, water source heat pumps, and solar thermal. If you have any of these renewable technologies installed, it is most likely that you are already registered for the RHI, however if you are not yet registered, we strongly recommend you apply to the scheme. The payments shouldhelp cover the initial install cost of the renewable technology that has been installed, and potentially cover any maintenance costs in the longer term.
When is the Renewable Heat Incentive being replaced?
The Renewable Heat Incentive is set to last until 31st March 2022. Originally, the scheme was intended to finish in March 2021, however the Government chose to extend it by an additional year due to its popularity.
When the RHI scheme ends in March 2022, it will be replaced by the Clean Heat Grant – this scheme is due to start a month later, in April 2022.
At the moment, the Government are proposing to make the Clean Heat Grant available for just two years ending in March 2024, and the funding is limited to £100m.
What is the Clean Heat Grant?
The Clean Heat Grant is being directed towards households and small non–domestic buildings across the UK.It will help with the upfront installation cost of heat pumps which provide space heating and hot water. The big advantage of the Clean Heat Grant over the RHI is its simplicity – doing away with the RHI’s heat demand based system.
The Government run scheme will provide grants of up to £4000 towards heat pump installations. It will cover ground source heat pumps, air source heat pumps, and water source heat pumps. The scheme suggests that the eligible heat pump installations must have a capacity of 45kW or less, which explains why this scheme is directed to smaller scale installations, leaving commercial building to fend for themselves.
In recent consultations regarding the Clean Heat Grant, the Government have implied that the grant could support biomass installations as well, however only when absolutely necessary. This is mainly due to the Committee on Climate Change who state that heat pumps offer the greatest potential for heat decarbonisation.
Are you eligible to get the Clean Heat Grant?
The Government have announced a few requirements that the applicant must meet in order to be eligible for the Clean Heat Grant. These are detailed below –
You must hold a valid EPC for the property in question. This means the EPC should be one issued in the last ten years. You can use the EPC register available to everyone on the Government website to check if your property has a valid EPC.
On the valid EPC, there must be no recommendation for loft insulation and/or cavity wall insulation. In some cases, this requirement will be exempt. For example, if your property is a listed building. The Government have also proposed that the insulation exemptions will follow those currently in place on the domestic RHI scheme.
The voucher application process will differ slightly from the domestic RHI. All applicants will need an assessment from at least one installer, and will need to submit a quotation. This is purely for administrative purposes, as it will reduce the amount of speculative applications and will enable more administration to be completed at the first stage.
Is the Clean Heat Grant better than the Renewable Heat Incentive?
In terms of future ideas, the Clean Heat Grant is part of a bigger Clean Growth Strategy, published in 2017, which is aiming to decarbonise the UK’s heat and phase out high-carbon fossil fuel installations in the 2020’s for off-gas properties.
However, for the consumer there is a significant reduction in funding. The domestic RHI is paid via a tariff system over seven years, and for a standard renewable heat project the consumer could expect to receive around £28,000. Whereas the Clean Heat Grant is limited to £4000 funding.
There is also a decrease in the variety of heating systems eligible for the Clean Heat Grant, compared to the RHI. Process heating, solar thermal, biogas combustion, hybrid heat pumps, and heat networks will be excluded from the Clean Heat Grant.
The key benefit is the scheme’s simplicity – a grant based scheme is far easier to run than one based on heat demand and export meters!
Our thoughts…
Here at TheGreenAge, we think that the Clean Heat Grant is a step in the right direction to reduce carbon heat in the UK.
Due to previous problems with the Renewable Heat Incentive involving the overall costs, the decreased amount of funding that the Clean Heat Grant will offer could be better in the long term, and could allow for gradual progress instead of jumping in at the deep end.
If you are thinking about installing a heat pump and have confirmed your eligibility for the Clean Heat Grant, we recommend participating in this scheme when it launches in early 2022.However, if you can act quickly, it may be worth considering trying to apply under the RHI scheme as we think this will be far more generous.
Tesla Powerwall Working in Combination with Solar PV
February 17, 2021
With a 90% efficiency rate, the Tesla Powerwall is a leading technology being used in homes to save energy by working in sync with solar PV systems. Solar PV is a renewable energy source for many homes across the world, using sunlight to generate electricity. The Tesla Powerwall is a chance for homeowners to improve their solar PV systems by storing excess electricity and allowing it to be used in the home instead of being exported back to the grid.
What is the Tesla Powerwall?
The Tesla Powerwall is a battery storage system that was launched in 2015 by entrepreneur Elon Musk, with hopes of saving energy and money for the homeowner. It consists of a rechargeable lithium-ion battery, and is designed to store excess energy generated in off peak times. For example, on a sunny day solar PV can generate more electricity than you need, and without storage this would be exported back to the grid.
For those with older solar PV systems the ability to store excess electricity is particularly useful because of the Feed-in Tariff. The feed-in tariff pays those with solar PV systems for producing electricity, but you also get paid for exporting electricity back to the grid. Typically older solar PV systems never had an export meter installed, so the energy companies didn’t know how much electricity was being exported – instead they paid you 50% of what was generated – regardless of whether you exported 0% or 100%.
Therefore, in this instance it makes sense to store all the electricity and export as little as possible back to the grid. The owner of the Solar PV system will be paid as if they are exporting 50% of what is produced regardless, but they benefit from being able to use all the electricity they produce!
If you find yourself in the position where the the sun isn’t shining (so your solar PV system is unable to generate any electricity), and there is also no stored energy in the Tesla Powerwall, then you don’t need to panic – the Tesla Powerwall is connected directly to the grid, so you can still use electricity as normal, although you do have to pay for it!
Why should I install a Tesla Powerwall in combination with Solar PV?
It provides an interruptible power supply. The Tesla Powerwall is fitted with a back-up gateway which can predict power cuts, by communicating with the grid. The Tesla Powerwall can then prepare and ensure electricity supply in your home during a power cut.
A solar Powerwall system allows you to use all the electricity you produce from your solar PV system even if there is little demand for the electricity as it is being produced (i.e. you can produce it during the day and then use the electricity when you come back from work in the evenings).
By using more of the electricity you have created for free – you are saving on your energy bills.
The Tesla Powerwall can be installed indoors or outdoors which makes it an easily accessible appliance for maintenance.
It works using AC power not DC, therefore is easy to install alongside existing solar PV systems.
If you are on an economy electricity tariff, such as Economy 7, where electricity rates are cheaper at off-peak times, it could save you even more money. By charging your Tesla Powerwall overnight (an off-peak time) using grid electricity, it will save you having to charge it in the daytime at a higher rate.
The Tesla Powerwall comes with a mobile app which notifies you of potential risks to your power supply (such as bad weather) and it also keeps track of your power flow. The power flow reports on demand, solar PV energy generation, and how much grid energy you are using.
How will it work in my home?
How much electricity will the Tesla Powerwall in combination with solar PV supply?
An average house in the UK uses 10KWh of electricity every 24 hours. The Tesla Powerwall has a maximum storage capacity of 13.5KWh, meaning it could power a house for a full day without having to recharge. However, this depends on the demand for electricity in the house as well. The Tesla Powerwall has a maximum power output of 5kW at one time, therefore most household electric appliances are covered by the stored electricity, however some higher wattage appliances are not. An electric shower (10kW) or an electric vehicle charger (7kW) would only be partially covered. This would mean the shortfall in electricity would need to be pulled from the grid (or solar system)
How many solar panels are needed to recharge the Tesla Powerwall?
Well, a 4KW solar PV system (16 panels) can produce 20KWh on an average sunny day which would fully charge the battery and supply enough electricity to run the home. However, in winter when there is less sunshine and sunlight, a 4KW solar PV system might only produce quarter of what it does in the summer. Therefore, there will be less electricity generated from the solar PV system, and less to recharge the battery. Due to this lack of stored electricity the demand for the grid will increase.
Can you install the Tesla Powerwall and Solar PV system in commercial buildings?
Yes you can! More batteries will need to be installed to ensure enough electricity is stored for the amount of people it is providing. Larger buildings will also need more or bigger solar panels, as they will need to generate more energy. The size of a solar panel depicts how much energy is generated per square metre. Compared to domestic properties, larger buildings home to businesses use electricity on a much larger scale, due to electrical appliances such as computers, machinery and kitchen equipment being used every day non-stop. So, by creating and storing their own energy this will save the business money in the long term.
How much does the Tesla Powerwall and Solar PV system cost?
The Tesla Powerwall 2 is priced at £5500 and up for the maximum storage capacity of 13.5KWh. If you have an existing solar PV system this is a reasonable price to start saving energy and money in your home. However, if you happen to be new to this with nothing in place already, you are looking at a much higher price. A 4KW solar PV system costs around £5000, which doubles the complete installation of both solar PV and the Tesla Powerwall 2. Most installers of the system are quoting between £8600-£10,500 depending on the complexity of the system.
The Tesla Powerwall does come with a 10-year warranty, providing some security to the customer. It is predicted to last many years longer, however keeping in mind that the capacity will reduce gradually over time. If the capacity falls below 80% of the original amount during the 10-year warranty, you will be guaranteed a replacement.
How much will the Tesla Powerwall and Solar PV system save me?
A solar PV system on its own saves £700-£800 a year in a domestic property, It is proven that the system will pay for itself in 9.5 years if electricity usage is average. Additionally, if the system is in place for 20 years, you will see a £5000-£6500 profit!
With the Tesla Powerwall 2 added to the solar PV system it will increase these savings dramatically. By allowing you to store the excess electricity generated from your solar PV system it is reducing the dependency on the grid even more. It is also increasing the possibility of your home running entirely on your own generated, renewable energy.
The Energy Price Cap
February 5, 2021
Big news today – OFGEM, the government regulator for gas and electricity markets in Great Britain, have announced there is going to be an increase in the energy price cap, meaning higher energy bills for all.
This increase in the price cap is due to come into effect in April 2021.
The energy price cap (also known as the default tariff cap or safeguard tariff) has been in place since 2019 and its aim was to try and help protect consumers against energy price hikes by the energy providers. In the following blog we are going to look into today’s announcement in more detail.
What is the energy price cap?
The energy price cap is a regulation set by OFGEM (the UK energy regulator) that all UK energy suppliers have to abide by. It is a limit on the unit rate and standing charge that energy suppliers can charge their consumers.
By setting a maximum price for each unit of energy, OFGEM should be helping households to save money on their gas and electricity bills. The price cap is reviewed twice a year – so while OFGEM is absolutely within its right to make the changes it has announced today – the prospect of higher bills when people are already struggling against the backdrop of a global pandemic is less than ideal.
The energy price cap only applies to certain energy plans which are the standard variable tariff and the default tariff – these plans are typically the most expensive. The energy price cap also affects prepayment customers in the same way. In the UK there are 4 million consumers on a prepayment plan, and they have a separate cap rate which is reviewed independently of the SVT cap by OFGEM.
The cap rate itself is based on several factors that OFGEM review. These consist of the wholesale cost of energy, network costs, policy costs, operating costs and prepayment meter costs.
How much is the energy price cap increasing by?
Since the energy price gap was introduced in 2019, most energy suppliers have set their default prices very close to the maximum cap rate. Here are what the new maximum cap rates will be as of April 2021 –
Standard variable tariff and default tariff
The current cap is set at £1042 per year. The new cap will be set at £1138 per year, an increase of £96.
Prepayment plan
The current cap is set at £1070 per year. The new cap will be set at £1156 per year, an increase of £87.
How has the energy price cap changed previously?
Since 2019, when the energy price cap was introduced, the price cap has gone both up and down. In the table below you can see the previous energy price cap rates and how they have changed. It appears OFGEM are now set on reviewing the price cap in April and October of each year. We are obviously very hopeful the price cap will not be increased again in October 2021 as that would be a further blow to consumers pockets.
Year
Cap Rate
Increase/Decreased
January 2019
£1137
N/A
April 2019
£1254
£117 increase
October 2019
£1179
£75 decrease
April 2020
£1126
£53 decrease
October 2020
£1042
£84 decrease
April 2021
£1138
£96 increase
Why is the energy price cap a difficult subject?
The energy price cap can still be more than the amount of the cheapest energy deal out there, so sometimes better savings can be made by switching.
It prevents energy suppliers from competing. By changing the maximum cap rate, it discourages suppliers and they will be less likely to gain customers against other suppliers, because they will not be able to offer prevention of higher costs.
When reviewing, OFGEM can still change the cap rate based on the wholesale market, so the energy price cap does not give you security. A fixed rate energy plan is something to consider when comparing energy deals, as it will secure your rates and protect you from potential price increases.
As always – we strongly urge all readers to use energy comparison sites to check for better energy deals. It is worth remembering, there is no difference on the quality of the electricity or gas you buy from different suppliers – this never changes. The difference in price they charge you is based on the customer service they provide, so definitely check to see if their might be a better deal out there for you.
Likewise, just because the energy price cap is increasing, this doesn’t mean your energy bill has to incease. The energy cap doesn’t look at the number of units of electricity or gas you use, so if you install energy saving measures that mean you use less energy in the home (e.g. by installing better insulation, a more efficient boiler or installing LED lighting for example) then you should still see your energy bills falling.
This website uses cookies. By continuing to use our website you agree to our Data Protection Policy, which you can view here.OK
Privacy & Cookies Policy
Privacy Overview
This website uses cookies to improve your experience while you navigate through the website. Out of these, the cookies that are categorized as necessary are stored on your browser as they are essential for the working of basic functionalities of the website. We also use third-party cookies that help us analyze and understand how you use this website. These cookies will be stored in your browser only with your consent. You also have the option to opt-out of these cookies. But opting out of some of these cookies may affect your browsing experience.
Necessary cookies are absolutely essential for the website to function properly. This category only includes cookies that ensures basic functionalities and security features of the website. These cookies do not store any personal information.
Any cookies that may not be particularly necessary for the website to function and is used specifically to collect user personal data via analytics, ads, other embedded contents are termed as non-necessary cookies. It is mandatory to procure user consent prior to running these cookies on your website.


 A
A